What makes up a Task
When you tap to add a Task, a whole form opens up. But it’s not as overwhelming as it looks!
Task Name. Of course you need to say what this task is! Keep this simple. If you need to add details, but them in the Notes at the bottom.
Goal. The second field is the Goal aka category that this task belongs to.
By default the Goal of the last Task you created will be selected here. Or if you just opened the app, the Goal that you gave the most time to is the assumed default. If you want to always have a specific Goal be selected instead of the last one, that is a Setting.
If you find this bothersome and want to just opt out of assigning your Tasks into categories, then it is very simple: just put all your Tasks into the same Goal. This will basically make the app behave like Goals don’t exist.

Duration. Here you say how long you expect this Task to take. The purpose is to see how booked you are when viewing your to-dos. Also, it enables the app to add up your time and see where your time is being spent.
If you wish, you can update the time the task took when you mark it complete. Any field can be edited at any point.
There is a slider to quickly select commong duration options. However you can tap the “more options” button to set an odd time like 1hour and 5minutes.
Note, even that “more options” dialog only lets you chose 5-minute increments. If you want to set down to 1-minutes, there is a Setting for that.
Similarly, if you want to just opt out of the whole concept of tracking duration for Tasks, that’s easy, too. In settings, set the default duration to 1 hour. Then never adjust the duration when adding tasks. This means that when the app adds up total time for your tasks, it actually means the number of tasks. So if the app says “3hrs” of tasks, just mentally convert that to “3 tasks”.

Schedule. Scheduling is what’s most unique about our to-do list app. Read more about it here.
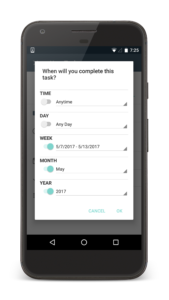
You can set different “granularity” for the schedule: year, month, week, or day. At a minimum, you must say what year you plan on doing this task.
Lets walk through the controls with an example. Assume your task was scheduled for this week as the default value. Taping the schedule opens the scheduling dialog. If you turn off the week switch, then it would be scheduled for this month. Or you can turn on the time switch, then it would be scheduled for right now (this very minute).
You can set any year, any month, any week, any day, or any exact date and time from this dialog.
Important! Scheduling in Simply Goals & Tasks is built around when you will do the task, not when it’s due.
Repeating. You’ll see a button below the schedule that says “does not repeat”. Tap this to set the task to repeat!
Note: expect a short loading screen when you save a repeating task.
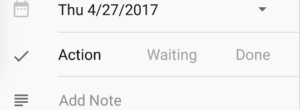
Status. The status options are Priority, Action, Waiting, Done, And Canceled.
Priority pushes the task to the top in any list.
Action is the default.
Waiting is for when this task is waiting on some other action before you can start it.
Done is when you finish. Woo hoo!
Cancelled is a shortcut for deleting the task. It is not added up as time spent on the goal. It acts like it was deleted but you will still see it (greyed out like a done task).
We plan to add custom Statuses as a Premium feature. If this is something you would like to see us release sooner, send us an email at hello@simply.digital — a single enthusiastic user can result in a feature getting pumped up the engineering queue.
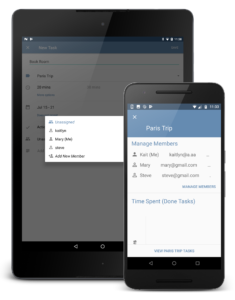
Assigned. This field only applies when the Task belongs to a Shared Goal. Read more about collaboration with Simply Goals & Tasks.
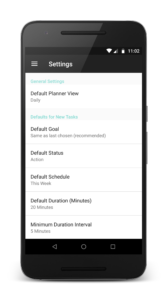
Customize Defaults
Go to Settings (from Main Menu, the 3 lines in the top-let corner)
Here you will see lots of options for what defaults fill the values of a new Task.
Note: Default Schedule does not apply when in the Planner. When you add a new Task from the Planner, the task has the time-frame you were just viewing prepopulated in the Schedule field.